In traditional photography, creating a forced perspective shot requires meticulous physical positioning, lens calibration, and absolute control over the physical distance between two subjects. Think of the classic tourist photo holding up the Leaning Tower of Pisa.
However, with the rise of generative AI, crafting a surreal forced perspective masterpiece has shifted from physical spacing to conceptual execution. Modern text-to-image models like Midjourney v6 and DALL·E 3 can seamlessly render mind-bending illusions where giants interact with miniature humans, but only if you know how to direct the engine.
If your AI-generated compositions look flat, synthetic, or struggle to sync the lighting between the two subjects, you are likely relying on generic prompts.
Below is the ultimate, field-tested master prompt followed by 7 practical tips to master surreal forced perspective photography using artificial intelligence.
The Universal Forced Perspective Master Prompt
Copy and paste this premium framework into your favorite AI generator. Simply modify the bracketed details to fit your unique creative concept.
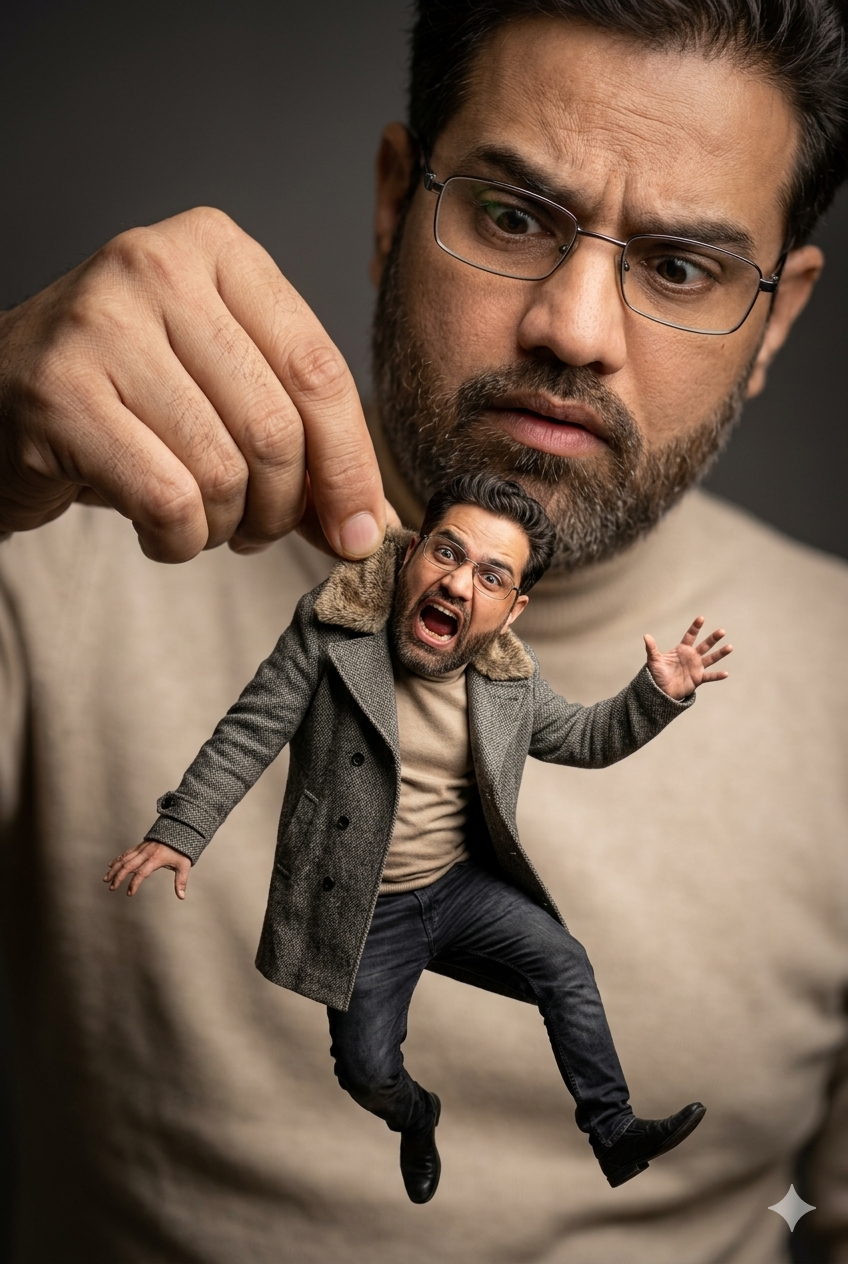
1. Master the Scale Discrepancy (The Core Concept)
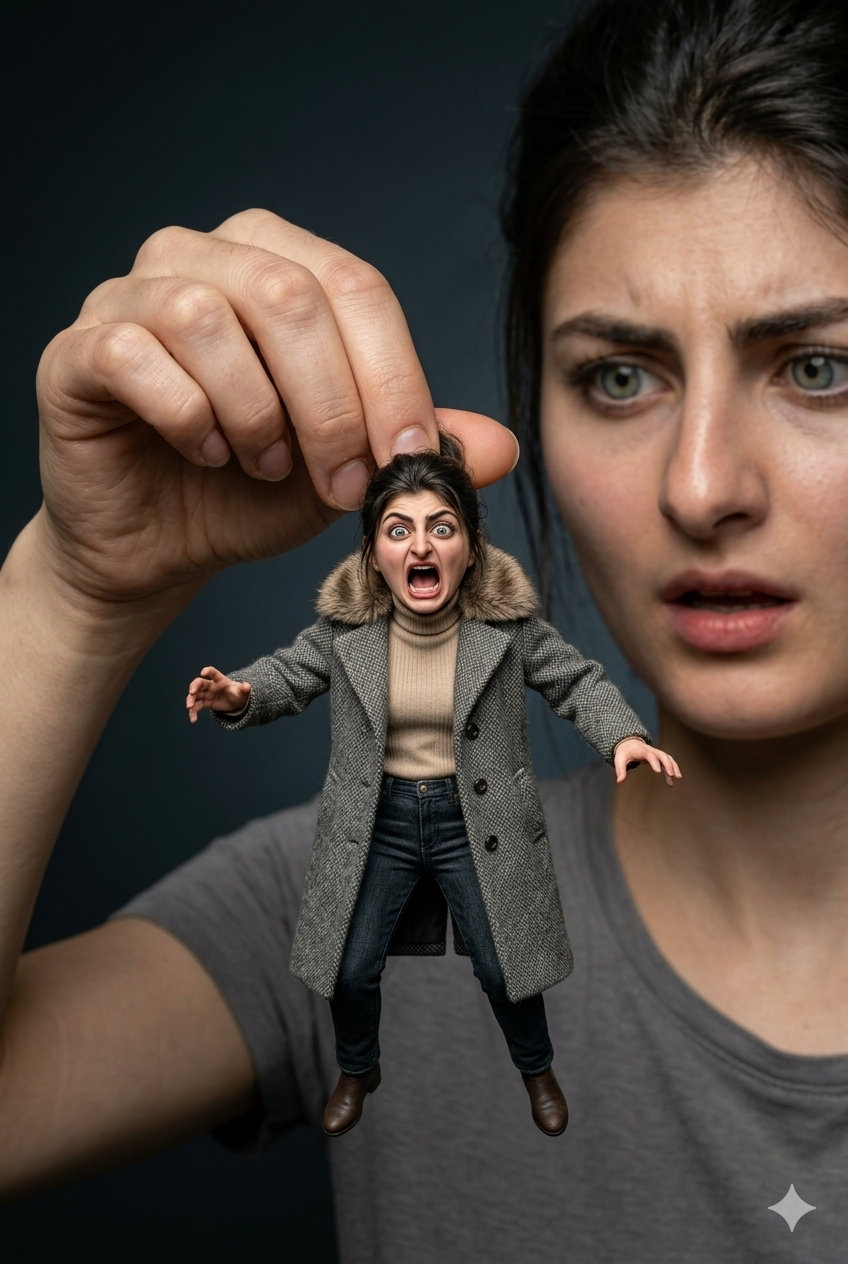
The magic of a surreal forced perspective image hinges entirely on extreme scale differences. To get the AI to cooperate, you must explicitly name both the giant element and the miniature element in clear, descriptive terms. Instead of just writing “a big person and a small person,” use high-contrast action words like “a giant hand pinching” or “a miniature explorer standing on a coffee mug.” This gives the neural network a clear spatial relationship to render.
2. Lock the Depth of Field (Simulate a Narrow Aperture)
By default, most AI models love to apply a heavy bokeh (blurry background) effect to anything in the foreground. In standard photography, if a giant hand is close to the lens and a miniature person is further back, one of them will naturally blur out. To break this limitation and sell the illusion that they share the exact same physical space, your prompt must command a deep depth of field. Use technical photography terms like “deep depth of field,” “f/11 aperture simulation,” or “both subjects in razor-sharp focus.”
3. Synchronize Shadows and Light Direction
The absolute biggest giveaway of a poorly generated AI image is mismatched lighting. If the light source hits the giant from the left, but the miniature subject has highlights on the right, the human brain instantly rejects the image as fake. Always specify a singular, distinct light source in your prompt modifiers. Phrases like “dramatic studio side-lighting,” “single overhead spotlight,” or “unified cinematic shadows” force the AI to cast cohesive shadows across both subjects, blending them into a single believable reality.
4. Inject High-Emotion and Storytelling
A great digital art piece tells a story in a fraction of a second. Don’t just generate static figures; focus heavily on facial expressions and body language to heighten the surrealism. If a giant is picking up a tiny human, specify the emotional contrast. For instance, instruct the AI to show “a giant with an intensely focused, curious expression” versus “a miniature person flailing their arms in panic.” This dramatic tension hooks viewers and keeps them staring at your content.
5. Enforce Texture and Material Consistency
When text-to-image engines attempt to merge two completely different scales, they occasionally make the mistake of rendering one subject with high detail (like realistic skin pores) and the other with a smooth, plastic-like texture. To combat this, your prompt must emphasize unified material properties. Including phrases like “identical fabric textures,” “matching clothing material,” or “consistent photographic grain” ensures that both the macro and micro elements look like they were captured by the same camera sensor.
6. Keep the Background Strikingly Minimal
When dealing with complex visual illusions like surreal forced perspective, a busy background is your worst enemy. Busy city streets, chaotic landscapes, or cluttered rooms distract the viewer’s eyes from the primary optical illusion. Opt for ultra-clean, minimalist backgrounds. Utilizing modifiers like “solid matte background,” “clean studio backdrop,” or “dark, atmospheric vignette” isolates your subjects and forces the audience to focus entirely on the mind-bending scale interaction.
7. Perfect the Composition via Low and High Angles
Camera angles completely dictate power dynamics in visual storytelling. If you want the giant subject to look genuinely menacing and massive, command a low-angle shot looking upward. If you want the miniature subject to feel incredibly vulnerable, implement a high-angle perspective. Combining these specific camera placements with mid-range focal lengths (like an 85mm or 105mm lens simulation) prevents unwanted lens distortion while preserving the striking proportion gap.
Quick Reference: Traditional vs. AI Forced Perspective
| Technical Element | Traditional Photography Approach | AI Prompt Engineering Strategy |
| Aperture Control | Physically closing down the lens to f/11 or f/16. | Use explicit keywords like "deep depth of field" or "pan-focus". |
| Subject Spacing | Placing subjects yards apart across a vast landscape. | Use actionable keywords like "pinching," "stepping on," or "holding". |
| Lighting Setup | Relying on massive outdoor environments or multiple flashes. | Enforce a unified source via "single overhead spotlight" or "side studio lighting". |
| Lens Selection | Wide-angle lenses to maximize depth of field. | Specify telephoto/portrait focal lengths like "85mm lens simulation". |
Step-by-Step Blueprint: Generating Your First Shot
Step 1: Pick a Premium Generator: For photorealistic textures and anatomical accuracy, Midjourney v6 or DALL·E 3 yield the highest success rates for forced perspective setups.
Step 2: Define Your Spatial Action: Write the exact physical point of connection between your two mismatched subjects.
Step 3: Apply the Structural Parameters: If using Midjourney, always set your aspect ratio to
--ar 16:9for landscape website headers, or--ar 2:3for portrait book covers and social media.Step 4: Run Generative Inpainting if Needed: If the AI perfectly captures the giant but distorts the miniature face, use the “Vary (Region)” or inpainting brush to clean up the details separately without ruining the rest of the canvas.
Video Traffic Strategy: Converting Static Illusions into Viral Motion
Don’t just post static images on your portfolio website. To maximize organic reach on high-traffic platforms like TikTok, Instagram Reels, and YouTube Shorts, repurpose your generated forced perspective assets into highly engaging short-form video content:
The “Behind the Illusion” Sketch Reveal: Film a quick 7-second transition video. Start by showcasing a rough, simple pencil sketch of a giant holding a tiny object, then use a quick beat-drop transition to reveal your hyper-realistic, completed AI art piece.
Dynamic Parallax Motion Shorts: Import your final high-resolution output into AI video generators like Luma Dream Machine or Runway Gen-3. Use text commands like “subtle 3D camera pan around the giant’s fingers” to create a stunning depth effect that makes the forced perspective feel incredibly tangible.
The Voiceover Tutorial Format: Share a screen recording of your prompt-typing process. Explain to your audience exactly how choosing specific depth-of-field modifiers changed the final output from a blurry mess into a clean digital art masterpiece.
Create Your Own AI Art Now!
Use our powerful, custom-built AI Prompt Generation tool to turn your words into masterpieces instantly.
Try Our AI Tool 🚀